
Logic Level Shifters
Product Description
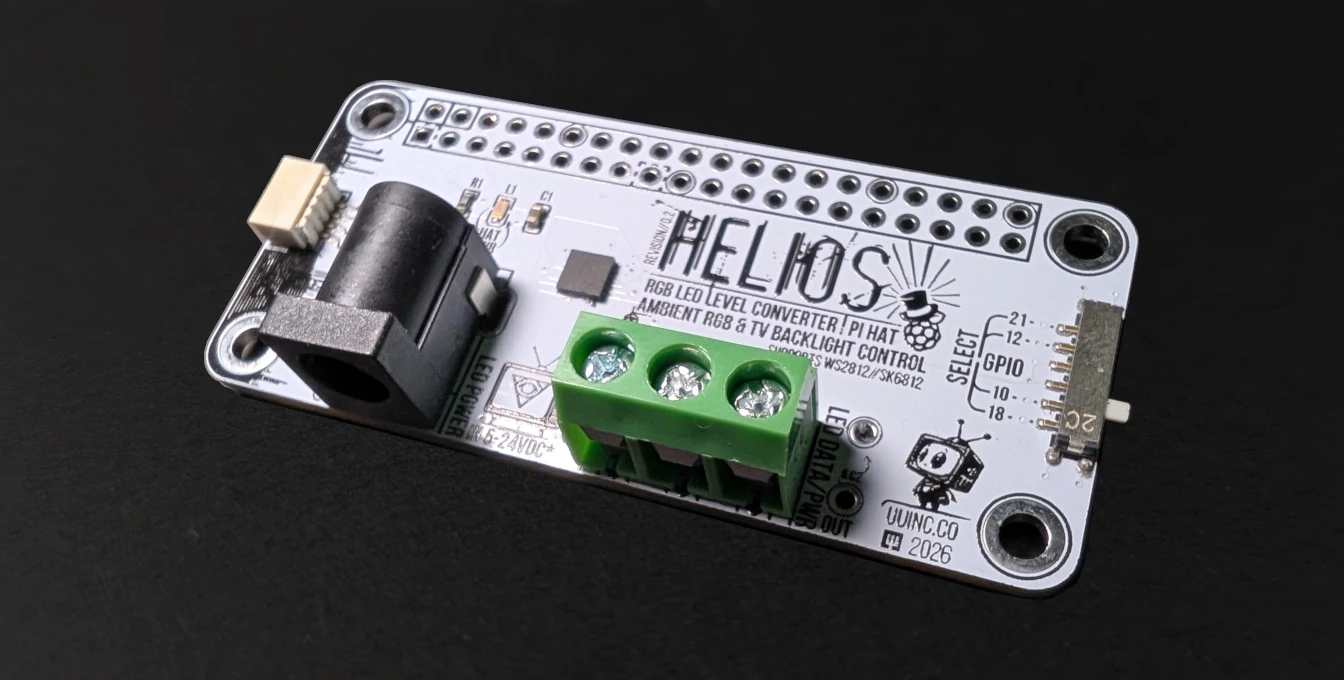
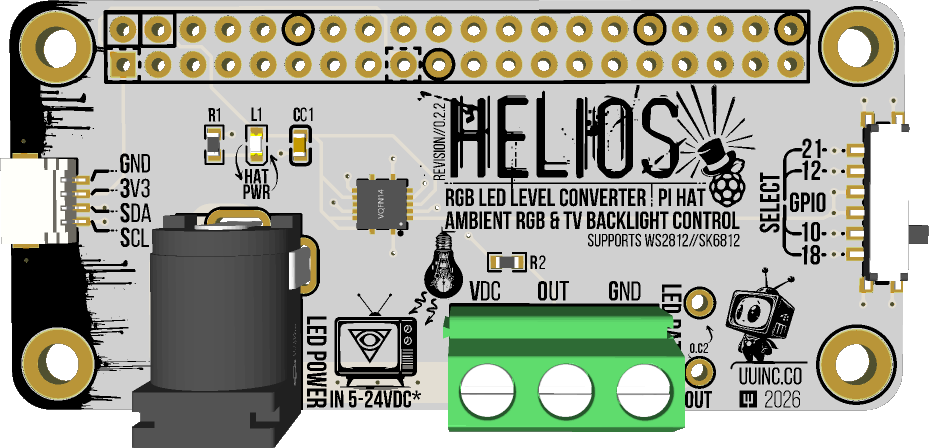
Our Helios Pi Hat Level Shifter is designed to quickly and easily allow you to integrate devices like an RGB LED Strip that requires 5V logic when you're using a device like a Raspberry Pi, Raspberry Pi Zero or any other Raspberry Pi device compatible with the Pi Hat Standard.
Based on the super reliable SN74HCT125N, it is a quadruple bus buffer gate designed for high-speed CMOS logic, featuring 3-state outputs and TTL-compatible inputs. The easy to integrate Pi Hat for the SN74HCT125N transforms it from a chip into a robust, easy-to-use module, essential for interfacing 3.3V microcontrollers with 5V components, especially RGB(W) Led Lights!
The Helios Pi Hat Level Shifter was designed with making the process of adding RGB(W) backlighting to your television with a Raspberry PI and compatible software like Hyperion easy and most importantly reliably. It's frequently happens that one of our friends or someone online followed a guide to integrate a 74HCT125N chip or worse a 74HC125 chip with a Raspberry Pi to make their own TV Backlighting solution. After many months of struggling with a half working project it isn't at all what they had dreamed it would be. It may work some of the time but it constantly flickers from hard to find grounding issues, or the TV's input source will just switch off and on like it doesn't care for what you were watching on TV, or they experience the most frusterating of issues.. The intermittent poltergiest. This X-filian like entity seemingly takes over WS2812b and compatible RGB LED's where the lights seem to be working for the most part but all of a sudden after many weeks of normal operations or deciding to finally show off your new super immersive TV lighting solution to friends and family decide that it's going to just start flashing random LEDs random patterns and random colours intermittenly.
Unfortunately for some homemade projects not using our boards we've noticed that the problems can spring up from multiple fronts.
- Problems with RGB LED's can be very intermittent which makes troubleshooting trickier. Hard to find the issue when it stops happening mid-debug.
- Making a solid prototype is hard, making a flakey one has never been easier!
- Many schematics freely available online for the 74HCT125N are more often then not are either obtuse in their instruction (Yes, this includes some of the old datasheets we've seen), incomplete and/or missing vital parts of the setup or are just plain wrong.
- Much of the of repeated advice that people follow generally doesn't hurt anything if its not needed (Ie. an extra decoupling capacitor here, some resistors there, etc) but in some cases can cause issues with the chips.
So what we wanted a device that required no messing around, is easy enough to setup and use for even the most tech-unsavvy of us, compatible with many different both cheap and accessible RGB(W) LED's, but the single most important thing for us, reliability. We don't want to see a single flicker, flash or luminous fart whilst we're watching TV that's being actively backlit by the RGB(W) LED's. So that's what we strove to design and build, initial designs were prototyped and then over time we iterated, stripping away the unnecesary to meet our goals. The Helios Pi Hat is now a drop-in and done setup for the hardware. All that's required is installation/setup of a compatible software package like Hyperion-ng and not only are you ready to go right away but we know it's going to keep on running for a long time. Some of our early models have been running their SK6812 RGB(NW) strips since 2021 and in the >5 years they have been running... . not a single issue!
When would you recommend using a Helios Pi-Hat?
Short answer:
Any RGB LED Project involving a Raspberry Pi. Example: TV Backlighting, Pi Zero RGB Alarm Clock, etc.
Slightly Longer Answer:
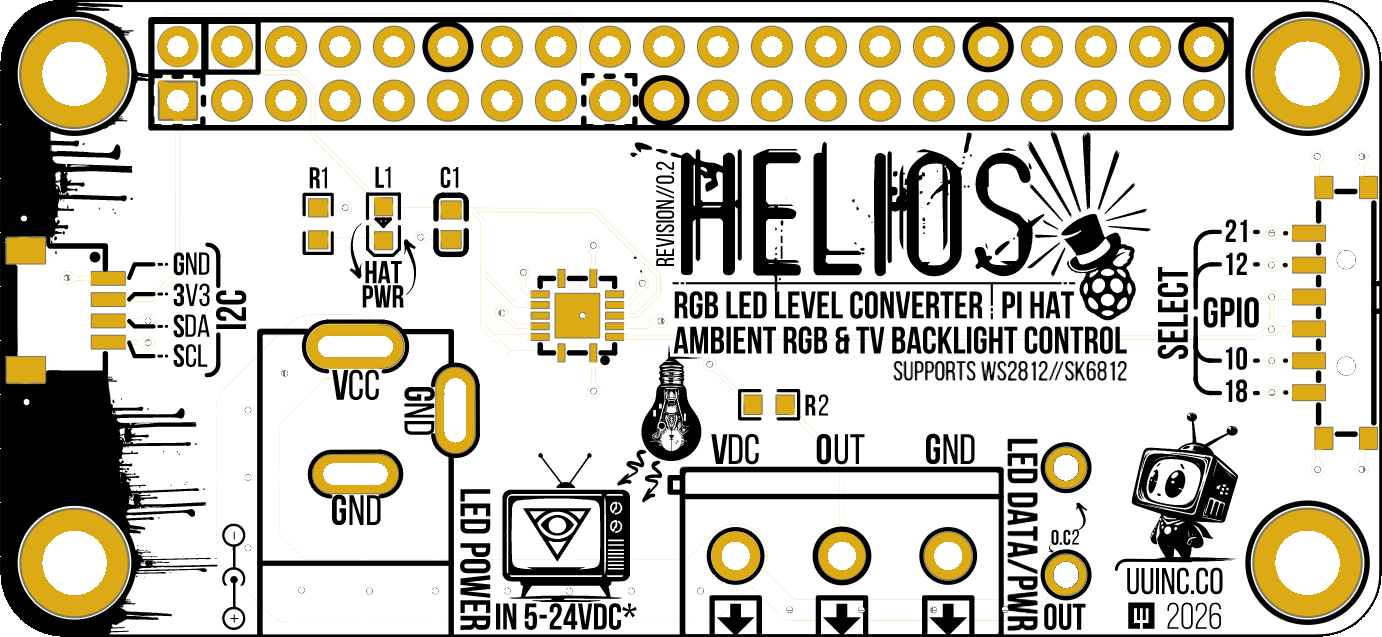
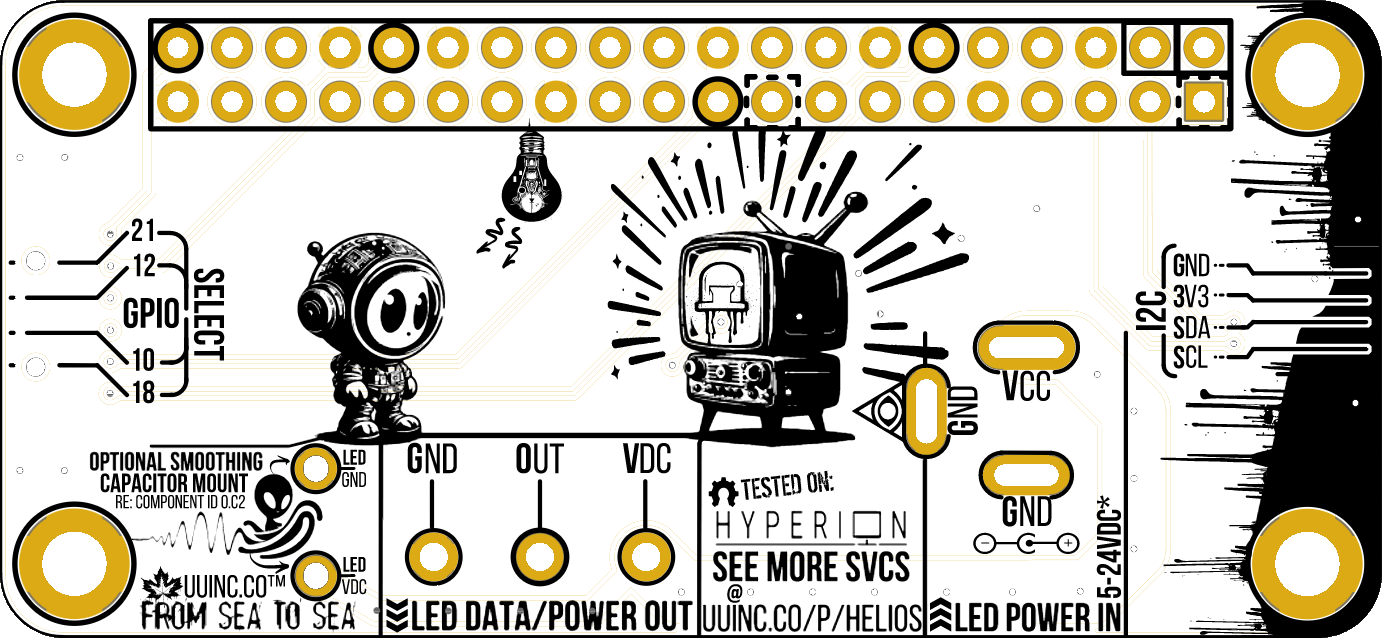
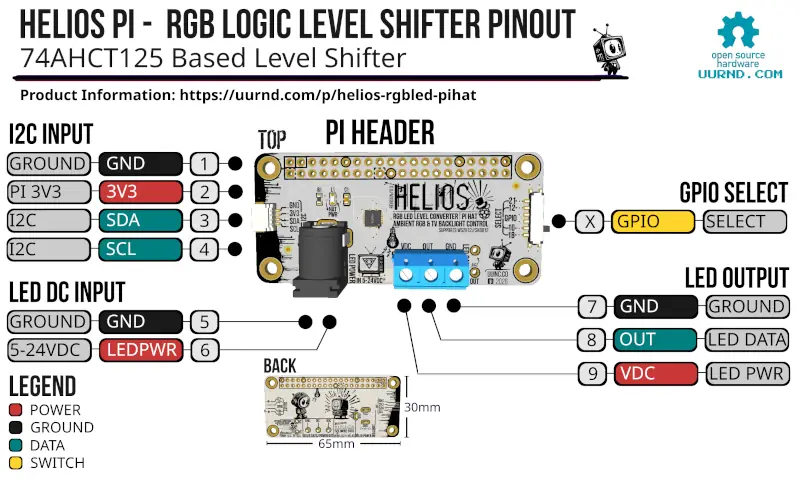
Whenever using any modern Raspberry Pi with the standard 26 pin Pi Header (Raspberry Pi 2,3,4,5, Pi Zero, Pi Zero 2 or W) to setup your very own immersive RGB(W) LED Backlighting for your Television or anytime you want to integrate RGB(W) LED's with a Raspberry Pi period with zero soldering, zero flicker and without wasting a minute of your day getting up running. Our Helios Pi-Hat level shifter uses a seperate external supply to provide power the LED's, this allows you to not only run any compatible 5V RGB(W) LED but additionally it can also control any compatible 12V-24V LEDs as well. External Power is provided to the board with a standard 5.5mm OD (outer diameter) / 2.1mm ID (inner diameter) Barrel Jack. Additionaly we have added a standard JST-SH 1mm connector so you can easily add additional I2C sensors like a light sensor, thermometer, etc.
What are the benefits of using a SN74HCT125N Powered Pi-Hat like the Helios?
-
Robust Reliable Power for your LEDs
- The External Power Supply allows you to power your LEDs from a seperate source of power, this provides a more robust power setup as well as more flexibility in what LEDs you're able to power.
-
Compatible with a Plethora of Ambient TV Backlighting Software
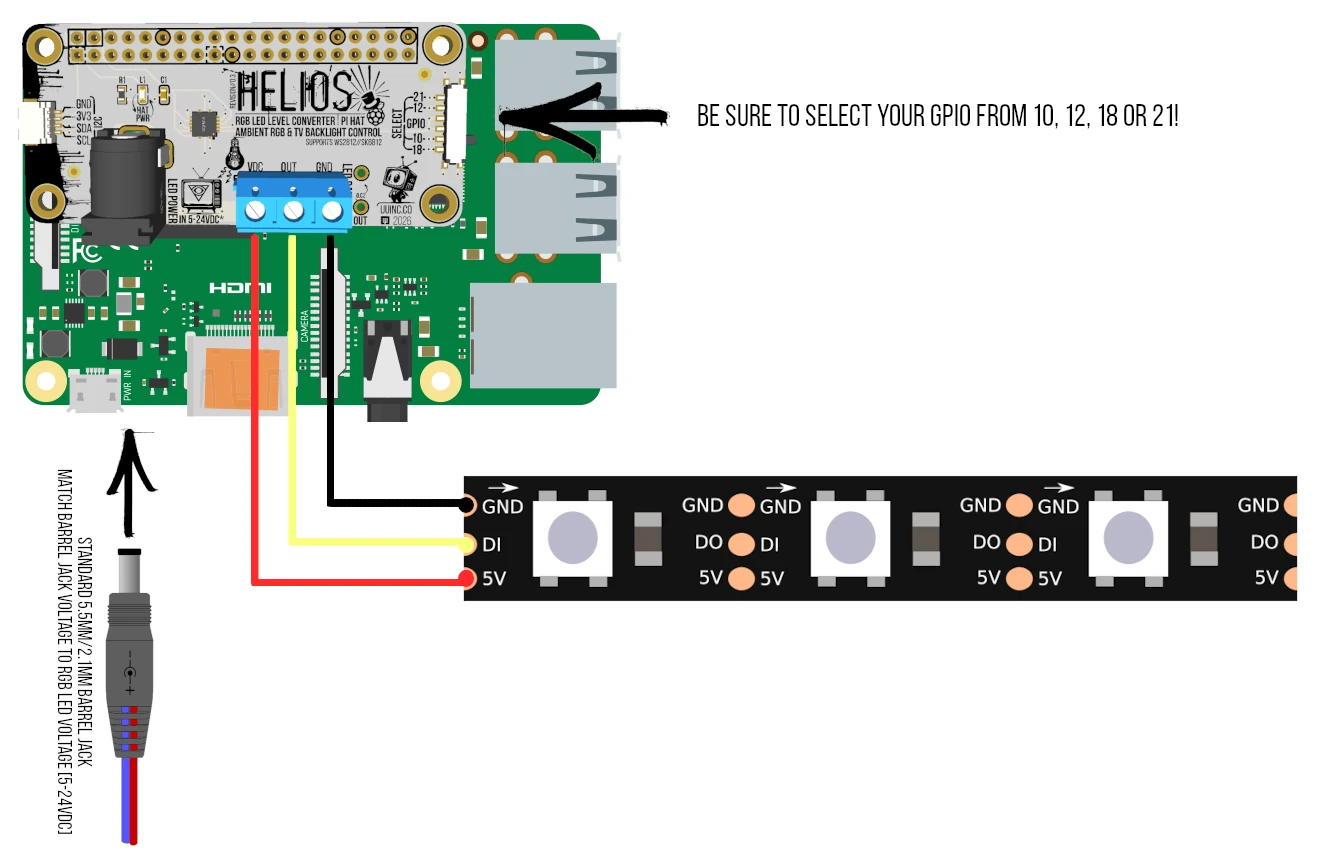
- Just install your favourite backlighting (bias/ambilight) software like Hyperion for your Raspberry Pi, select your GPIO on our PI Hat, plug in the Lights and you have a functioning RGB Backlight for your Television. Prefer another software? We don't lock you down.
-
Easy switch GPIO Selection
- When you want to switch which GPIO to use with your Raspberry Pi to control your LED's normally you would have to fiddle around in the software, research the pinout again or find a datasheet so you know where the heck to move that obtuse jumper to enable the GPIO your after. Well, don't worry about that. We have implemented a simple 4 position switch to let you choose from the most commonly supported GPIO pins with TV Backlighting software.
-
Interface Safely
- Protects your sensitive 3.3V Raspberry Pi from damage when interfacing with 5V components
-
Improved Signal Integrity
- It acts as a buffer, providing strong 5V signal driving while also improving signal quality over longer runs of cables compared to direct GPIO connections.
-
Lower Delays
- Our boards do not slow down communication protocols or high-speed data lines.
Why choose a UU R&D Device?
-
Proudly Made in Canada
- All our products and (whenever possible) parts are manufactured in-house in Canada.
-
Every Single Device is Personally Tested
- You read that right, we're not testing one out of ten thousand, or one out of a thousand or even one out of every hundred products. We test, approve and verify with human beings every single device we manufacture. This way were able to confirm each device is working before it leaves our offices and have a verifiable chain we can use to track down problems if anything happens. Included with every single UU R&D device is a guarantee that confirms it's testing and operation prior to shipping it to you.
-
Our devices are reliable
- Not only do we use most everything we make in house, we use it for the long haul. With some of our Helios Pi-Hat's continuing to run for over their 5th straight year(s) of usage running 24/7 without fail.
-
Research, Iterated and Dogfood Eaten.
- All our designs are thoroughly researched, designed and iterated on to provide you with the most reliable and useful devices. Not only that we eat our own dogfood here. We actually use all the products we make. If you'd like to see some of our projects we've made with our own products we will be posting them to uurnd.com/projects
-
Inexpensive
- Since we manufacture all our devices in house we're able to offer cheaper prices then other independant and even some international companies. Sometimes we're able to provide them cheaper then if you were to purchase the raw materials yourself.
Compatible Devices:
While our boards will work anything that regular 74HCT125N chip will work with they're designed to work specifically with a Raspberry Pi connecting to the Raspberry Pi's GPIO as a Pi-Hat. Here is a list of devices that we have tested it on and can confirm it works perfectly.
Raspberry Pi Boards (3.3V aka the Low side):
- Raspberry Pi (2,3,4,5)
- Raspberry Pi Zero/W
- Raspberry Pi Zero 2/W
Peripheral Devices (5V aka the High side):
- WS2812B RGB Leds
- WS2813 RGB Leds
- WS2815 RGB Leds
- SK6812 RGBW Leds
- Adafruit's NeoPixel RGB Leds
- WS2811 12V Addressable RGB Leds (They use 5V logic)
- Numerous 5V Sensors, Motor Drivers, LCDs and Motor controllers
See our full list of devices we have tested on our Github
Why are there 2 other Helios Breakout Boards in addition to this Pi Hat? Should I be using the Pi Hat, the 3 Pin or the 4-Pin devices?
When you're working with a Raspberry Pi and you want the max level of reliability, stability and power for your LED's or for projects like TV Backlighting that require more power and can be very finicky if you connect anythiing askew we suggest running it on our Helios Pi-Hat. Which when it arrives comes ready to go with a seperate external barrel jack connector for powering your LED's (supports 5V-24V RGB LEDs provided they use 5V for data), a physical switch to select your GPIO, No solder screw terminals to connect your RGB LED's, an extra I2C Port to add additional sensors like a light meter and just slots onto your Raspberry Pi's GPIO with your choice of male or female pin headers so you'll be ready to watch TV in immersive bliss.
We recommomend our Helios 3P1C/4P1C board's when you're integrating LED's or sensors within your project or when working with a non-raspberry pi device.
Our 3 Pin boards are designed to be as small as possible while remaining easy to use and integrate. They are especially easy to integrate in-line with an LED Strip simple attaching them directly to the led strip itself. They provide pins 5V, Ground and Data In on one side and on the output side 5V, Ground and Data Out.
While both the 3 Pin and 4 Pin boards are technically compatible with higher voltage LED Strips (as those LED Strips still use 5V data lines) the 4 Pin boards are easier to integrate as they have a seperate pin to run your LED Power on so you dont need a seperate wire when integrating external power. The 4 Pin boards have pins: 5V, Ground, Data In and External Power (0V-24V) and on the output side: 5V, Ground, Data Out and External Power (0V-24V)
Tips for using the Helios Pi-Hat Breakout Boards:
-
Always keep the wires between your LED's input and the Helios Level Shifter's output as short as possible.
-
Connected the Helios Pi Hat but aren't getting any glowing LED's or any other output? Most often the problem is using the incorrect GPIO.
-
To prevent damage to your microcontroller, LEDs or any other sensor or device you may be connecting to said microcontroller whenever possible turn off the power before connecting or disconnecting them to the MCU. However, if you're able it is better to completely unplug the power source from the MCU or device before connecting/disconnecting it even when the power is already turned off. Then proceed to turn it on after its fully connected.
-
If it's not possible to plug your device(s) into your MCU with the power disconnected then be sure to always connect your devices pins to the MCU in the following order: Ground, Data and then lastly connect Power. To disconnect a device you follow the reverse ordering: Disconnect Power First, Data and then Lastly Ground.
-
If you're using an LED Strip that is anywhere between 5V to 24V you can still use one of our 3 or 4 pin level shifters. Most RGB Leds still use 5V for their data IO pins so you can control them with our level shifter no problem. Check one of our connection guides below.
Heads Up!
Always double check your LED's use 5V logic on their data lines before controlling them with any MCU or the Helios Level Shifter
Schematics, Layout, BOM and Gerbers
Helios RGB LED Level Shifter Pi Hat
Supports 5V Logic LED Strips [5V-24V] like WS2812b
SKU: 0003PIHT001
Stop Struggling with dim, randomly flickering RGB LED Strips! Simply pop one of our Helios RGB Level Shifters onto your Raspberry PI (Tested on Raspberry PI's Models 2,3,4,5, Zero and Zero W) and any 5V-24V RGB LED's with 5V logic will work just like the RPI natively supports 5V communication. This device enables a quick and easy connection for higher voltage devices like WS2812b, SK6812 and many other RGB LEDs and your Raspberry Pi which only supports 3V GPIO regularly.
Key Features:
- Simplest RGB(W) LED setup. Plug into your Raspberry PI and your finished
- Long Lifetime
- Open Source Product
- Provides an additional I2C Breakout Connector
- No Soldering Connections for RGB(W) LEDS and your LED Power Source
 Canadian designed and manufactured